Fabulous Stamper

Paper Pumpkin Alternatives- February 2024 Sweet Springtime
Aug 15, 2025
6 min read
0
2
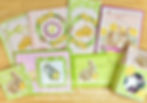
February 2024- Sweet Springtime Paper Pumpkin Alternatives
I love Making alternatives for my all-inclusive Paper Pumpkin kits.
3D Wreath Chick Card
Materials:
· Green card base
· 1-wreath die cut piece
· 1-Chick die cut piece
· Embellishments
· Glue Dots
· Stampin’ Dimensionals
Instructions:
1. Glue the chick die cut piece to the card front.
2. Add Dimensionals to the back of the wreath and place it on the card.
3. Add Embellishments.
Mini 3x3 Card
Materials:
· Green card base
· 1-rabbit die cut piece
· Embellishments
· Twine
· 3x3 in envelope (optional)
· Glue Dots
· Stampin’ Dimensionals
· Paper Snips
· Early Espresso ink spot (optional)
· Paper Trimmer
Instructions:
1. Trim the card base to 3 in. x 6 in with the score line at 3 in. Save the other piece for another project.
2. Add Dimensionals to the back of the rabbit and place it on the card.
3. Tie a small bow and attach it to the rabbit with a glue dot.
4. Add Embellishments.
5. Stamp a chick on the outside of the 3x3 envelope with Early Espresso ink.
Window Treat Box
Materials:
· Treat box
· 1-rabbit leaves die cut piece
· 2-daffodil die cut pieces
· Twine
· 1 ¾ in. circle punch
· 2 ¼ in. x 2 ¼ in. Acetate sheet from stamp set or Window Sheet
· Glue Dots
· Stampin’ Dimensionals
· Candy- Hershey’s Chocolate Eggs
Instructions:
1. Measure the approximate placement of the circle on the panel. Mark it at approx. 1 ¼ in. You can also mark the other edge, but I did not want to leave a mark on the design side. TIP: Even if the circle is off-center, don’t worry. You can add daffodils around the mistake. 😊
2. Trim a small rounded piece from the flap so that it does not show through the window.
3. Cut the acetate sheet or window sheet to 2 ¼ in. x 2 ¼ in. Attach it over the hole with adhesive.
4. Fold the box according to the directions in the kit.
5. Fill the box with candy and then tie the box closed.
6. Add Dimensionals to the back of the daffodils and rabbit and attach them to the card.
Bubble Bath Pink Chick Card
Materials:
· Green card base
· Scrap piece of Basic White Cardstock
· 2 ¼ in. x 2 ¼ in. Basic White Cardstock
· 4 in. x 5 ¼ in. Bubble Bath Cardstock
· 4 in. x 5 ¼ in. Basic White Cardstock (inside layer)
· 4 ¼ in. x 11 in. Granny Apple Green Cardstock (scored 5 ½ in.)
· Embellishments
· Lemon Lolly Ribbon (3/8 in. Sheer Ribbon Combo Pack)
· Light Lemon Lolly Stampin’ Blend Marker
· Dark Daffodil Delight Stampin’ Blend Marker
· Dark Pumpkin Pie Stampin’ Blend Marker
· Glue Dots
· Stampin’ Dimensionals
· Paper Snips
· Paper Trimmer
· Early Espresso Ink
Instructions:
1. Use the scrap from the previous project. If you did not do that project, cut a 3 in. x 3 in. piece from the card. Save the other piece for another project.
2. Stamp a daffodil onto the Basic White square with Early Espresso ink.
3. Stamp a chick onto the scrap of Basic White cardstock and the bottom corner of the Basic White layer with Early Espresso ink.
4. Color the chicks and daffodil with Stampin’ Blend Markers.
5. Add a Dimensional to the back of the chick and attach it to the Daffodil square.
6. Glue the Daffodil piece to the green square.
7. Wrap Lemon Lolly ribbon around the Bubble Bath layer and tie a bow.
8. Glue the Bubble Bath layer to the card base.
9. Add Dimensionals to the back of the green square and attach it to the card.
10. Glue the Basic White layer to the inside of the card.
11. Add Embellishments.
Gingham Chick Card
Materials:
· � Petal Pink Rabbit card base
· 1-wreath die cut piece
· 1-Petal Pink label
· 1 ½ in. Circle with Berry Burst Cardstock
· 1 ¼ in. Circle Basic White Cardstock
· 4 in. x 5 ¼ in. Basic White Cardstock (inside layer)
· 4 ¼ in. x 11 in. Petal Pink Cardstock (scored 5 ½ in.)
· Iridescent Foil Gems
· Light Lemon Lolly Stampin’ Blend Marker
· Dark Daffodil Delight Stampin’ Blend Marker
· Dark Pumpkin Pie Stampin’ Blend Marker
· Glue Dots
· Stampin’ Dimensionals
· Paper Trimmer
· Early Espresso Ink Spot
Instructions:
1. Cut the card base in half and set the rabbit side aside.
2. Trim the gingham side to 4 in. x 5 ¼ in.
3. Glue the gingham piece to the Petal Pink card base.
4. Add Dimensionals to the back of the wreath die cut piece and attach it to the card.
5. Stamp the chick onto the Basic White circle and the bottom corner of the Basic White layer.
6. Color the chicks with Stampin’ Blend Markers.
7. Add a Dimensional to the back of the chick and attach it to the Berry Burst circle.
8. Glue the Berry Burst circle to the center of the wreath.
9. Stamp “Springtime Greetings” onto the label with Early Espresso ink.
10. Attach the label to the card below the wreath with Dimensionals.
11. Glue the Basic White layer to the inside of the card.
12. Add Iridescent Foil Gems.
Berry Burst Rabbit Card
Materials:
· Petal Pink Rabbit card base
· 4 ¼ in. x 11 in. Berry Burst Cardstock (scored 5 ½ in.)
· 4 in. x 5 ¼ in. Basic White Cardstock (inside layer)
· 1-Berry Burst label
· 2-Daffodil die cut pieces
· 1-White Frame die cut piece
· Petal Pink Ribbon (Duo Ribbon Combo Pack)
· Glue Dots
· Stampin’ Dimensionals
· Paper Trimmer
· Early Espresso Ink Spot
· Daffodil Delight Classic Stampin’ Pad
Instructions:
1. Use the Rabbit piece from the previous card. If you did not do the previous card, cut the card base in half, and set the gingham side aside.
2. Trim the rabbit side to 4 in. x 5 ¼ in.
3. Glue the frame to the rabbit piece.
4. Wrap the Petal Pink Ribbon around the top of the card and tie a bow. TIP: If the ribbon is loose, use tape to secure it more tightly from the back.
5. Attach the rabbit layer to the card base.
6. Stamp “Happy Easter” onto the label with Early Espresso ink.
7. Attach the label to the card with Dimensionals.
8. Add Dimensionals to the back of the daffodils and attach them to the card.
9. Add Embellishments to the card.
10. Stamp a daffodil on the Basic White layer with Daffodil Delight ink.
11. Glue the Basic White layer to the inside of the card.
Soft Seafoam Chick Card
Materials:
· 4 ¼ in. x 11 in. Granny Apple Green Cardstock (scored 5 ½ in.)
· 4 in. x 5 ¼ in. Soft Seafoam Cardstock
· 4 in. x 5 ¼ in. Basic White Cardstock (inside layer)
· 1-Chick die cut piece
· Duo Ribbon Combo Pack
· Scotch Tape
· Adhesive
· Stampin’ Dimensionals
· Early Espresso Ink Spot
· Paper Snips
Instructions:
1. Cut 5--- 6 ½ in. pieces of Petal Pink ribbon.
2. Wrap them around the Soft Seafoam cardstock and secure them with tape. TIP: Attach the outside pieces first. Next, attach the center piece. Finally, attach the other two pieces. This helps center all of the pieces on the card.
3. Glue the ribbon layer to the card base.
4. Stamp “Happy Easter” onto the chick piece with Early Espresso ink.
5. Wrap the Chick piece with Lemon Lime Twist ribbon and tie a bow.
6. Attach the chick piece to the card with Dimensionals.
7. Glue the Basic White layer to the inside of the card.
Lemon Lime Twist Gingham Card
Materials:
· 6 ½ in. x 6 ¼ in. Lemon Lime Twist Cardstock (scored 3 ¼ in. on the LONGER side)
· 3 in. x 6 in. Granny Apple Green Cardstock
· 2 ¾ in. x 5 ¾ in. Lemon Lime Twist piece (Glorious Gingham DSP)
· 3 in. x 6 in. Basic White Cardstock (inside layer)
· 1-rabbit die cut piece
· Lemon Lime Twist Ribbon (Duo Ribbon Combo Pack)
· Embellishments
· Adhesive
· Paper Snips
· Stampin’ Dimensionals
· Early Espresso Ink Spot
Instructions:
1. Stamp “Happy Easter” to the bottom right corner of the gingham piece with Early Espresso ink.
2. Glue the gingham piece to the Granny Apple Green piece.
3. Wrap the Lemon Lime Twist ribbon around the Granny Apple Green piece and tie a bow.
4. Glue the Green layers to the card base.
5. Add Dimensionals to the rabbit and attach it to the card.
6. Add Embellishments.
7. Glue the Basic White layer inside the card.

